How to Build a Golf Ball Display Case
- Trim the Boards. Start with trimming the boards to the desired size. ...
- Mark and Create Indentations. Measure and place a mark at the center of all shelf boards. ...
- Secure the Board Shelves. Position one side piece on its flat larger side and mark 7 inches from the board top. ...
- Sand Edges. ...
- Secure the Ready Display Case. ...

How to display golf balls on shelf?
Just equip yourself with the needed materials, and following the guide below, you will have a nice rectangular case that displays every precious golf ball on a separate shelf. Start with trimming the boards to the desired size. Two wooden boards, measured three feet each, will make the sides of the display case.
Can you build your own golf ball display case?
If you are a golf fan who is fond of your collection, you might love the idea of having a golf ball display case. Rather than taking the risk of losing your logo balls in the woods, you may build a personalized display case. This woodworking project may be completed with relative ease.
How many balls does a golf ball display rack hold?
Golf Ball Display Rack, Holds 24 balls, 4 Poker Chips and Ball Markers Ad by GolfBallFlexRackAd from shop GolfBallFlexRackGolfBallFlexRackFrom shop GolfBallFlexRack 5 out of 5 stars(14) $24.99FREE shipping Add to Favorites
How much does a wall mount golf pencil rack cost?
Wall Mount Golf Pencil Rack Ad by WhiteRiverWoodworksAd from shop WhiteRiverWoodworksWhiteRiverWoodworksFrom shop WhiteRiverWoodworks 5 out of 5 stars(216) $180.00 Add to Favorites Custom Built Rectangular Golf Ball Display/Holder
How do you make a golf ball in a cage?
3:515:14How To: Golf Ball in a Cage - This One is Fun! - YouTubeYouTubeStart of suggested clipEnd of suggested clipAnd apply some pressure and push it into. The cage and just like that you have a golf ball. InsideMoreAnd apply some pressure and push it into. The cage and just like that you have a golf ball. Inside of a cage of wood. This is a really cool trick.
How do you attach a golf ball to Wood?
4:1210:26Fun Scrap Wood Projects - Magic Golf Ball and Cube Within a CubeYouTubeStart of suggested clipEnd of suggested clipThe trick is to heat up some water to almost boiling and submerge the wood in the water for aboutMoreThe trick is to heat up some water to almost boiling and submerge the wood in the water for about seven or eight minutes. This makes the wood more pliable.
What's the diameter of a golf ball?
1.680 inchesHence the majority of the manufacturers produce golf balls with the maximum allowed weight of 1.620 oz./ 45.93 g. Golf Ball Size: According to the USGA Rules of Golf, the diameter of the ball shall not be less than 1.680 inches (42.67 mm).
How do you make a DIY golf ball?
1:342:40How to print Golf ball by hand - YouTubeYouTubeStart of suggested clipEnd of suggested clipOkay you activate it must draw activating cloth but press hard with the activating cloth make sureMoreOkay you activate it must draw activating cloth but press hard with the activating cloth make sure it's in the dimples.
How do you drill wooden balls?
0:022:59How to drill a hole through the centre of a wooden ball (Puppet Making ...YouTubeStart of suggested clipEnd of suggested clipSo the ball can rotate around the middle now this is quite difficult to do if you're trying to do itMoreSo the ball can rotate around the middle now this is quite difficult to do if you're trying to do it by hand but if you've got a drill press or pillow drill.
How do you drill a hole in a golf ball?
0:0814:30What Happens When You Drill Holes in a Golf Ball?! | Inspired by GM GolfYouTubeStart of suggested clipEnd of suggested clipSomething i'm about to drill some holes let's do. This all right so uh kind of a cold morning so iMoreSomething i'm about to drill some holes let's do. This all right so uh kind of a cold morning so i got my garage closed the lighting should be just fine um but let's go ahead and pick a drill.
What makes a golf ball Illegal?
Legal golf balls can't be smaller than 1.68 inches in diameter. The Polara balls have a diameter of 1.68 inches (the same size as normal). If you have a smaller ball, you'll have less drag and that should give you more distance.
Are bigger golf balls legal?
Turns out there isn't a rule on how LARGE a golf ball can be, there is only a rule about how SMALL it can be - so as long as a golf ball is at least 1.68 inches in diameter, it is legal. And most golf balls are 1.68 because for a variety of reasons, smaller is better for a professional golfer.
Why is a golf hole 4.25 inches?
Four-and-a-quarter inches in diameter. R&A ADOPTS 4.25-INCH HOLE SIZE That first hole-cutting implement utilized a cutting tool that was, you guessed it, 4.25 inches in diameter. The folks running the R&A apparently liked that size and so adopted it in their rules for 1891.
Does acrylic paint stay on golf balls?
Painting Golf Balls. Choose how you want your golf balls to look. You can use acrylic paint and paint brushes, or spray paint for a more solid look of one color.
Does Sharpie stay on golf balls?
I was anxious to try this on my golf balls. The sharpie permanent markers work great but I wash my golf balls often on the course, a clean golf ball is much easier to find. The sharpie permanent markers would wear almost away after a round or two.
Will spray paint stick to golf balls?
Both spray paint and acrylic brush paint provide a good grip on golf balls. Therefore, you can use either or both types for the coloring process of golf balls. However, spray paint will be more time-saving and convenient for coloring, so it will often be used more.
I am so excited to show you how to build a golf ball display case
My husband loves to golf, and each time he golfs at a new golf course, he buys one of their golf balls from the pro shop. By now he’s collected a few different golf balls from some pretty cool courses.
Find the free golf ball shelf building plans here
If you used this tutorial in your own home, I would love to see photos and share them here on my blog! Please email completed photos to [email protected]
Step 1: Tools and Materials
As you can see the tools and materials required are fairly simple. I used a table-mounted power miter saw to fashion my jig but the handheld one would have worked as well. As I was going to be working on a verticle surface I made a more complicated jig than I might have otherwise made. The tees will form the pegs that hold the balls in place.
Step 2: Test Your Materials
I was going to be doing a lot of drilling and hammering in an exposed area so I wanted to be sure this plan was going to work out before I started on the actual bookshelf.
Step 3: Fashioning the Jig
The first thing to make is the jig. The function of the jig is to give you a template for placing your holes so that they are evenly spaced and provide a guide for your drill.
Step 4: Drilling the Holes
I was using narrow scrap for this as it was the only hardwood on hand but if I had a wider piece I would have aligned the holes so that the bottom of the jig and the top row of holes were equidistant from the bottom row of holes so that I could use the jig itself to space out multiple rows.
Step 5: Mounting the Tees
Now that the holes were in place the last thing to do was to mount the tees in them. A standard size tee has quite a long shaft, even the shortest ones, so you will probably want to cut them down a bit. It's aesthetically more pleasing to have the balls fit tightly to the surface on which they are mounted.
Step 6: Putting Up the Golf Balls!
Everything is in place now, all that remains is to mount your golf balls.
Woodworking 101 Golf Ball Display Rack Woodworking Plans
Woodworking is a useful skill. It involves creating usable and/or decorative things from wood by cutting, shaping, and joining pieces together.
Here are some things to help you have a smooth sailing journey
Let’s start with the basics. To do some woodworking, you’d need a workspace. People think of their garage or basement as the best place to create a workspace. While these are great options, consider the following: is it safe? You can’t work in an area that has unstable surfaces. Unfixed electric cords can cause a trip hazard.
Final Thoughts Golf Ball Display Rack Woodworking Plans
When it comes to woodworking, it can be messy, loud, and time-consuming. You could also say the same for many other hobbies. You can certainly adapt the more that you pursue this.

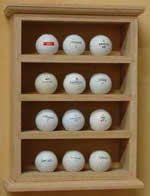
Step 1–Trim The Boards
- Start with trimming the boards to the desired size. Two wooden boards, measured three feet each, will make the sides of the display case. Two other boards will be positioned at the top and bottom of your case. These boards need to be 5 inches wide by 1 ½ feet long. In addition, you need five smaller boards for the shelves of the display case. These...
Step 2–Mark and Create Indentations
- Measure and place a mark at the center of all shelf boards. The marks will help you position the golf ball indentations. These are the places where your favorite balls will rest. Take the chisel and remove dime-size chunks at the points you marked. Make the indentations a quarter of an inch deep and sand them down to give a smooth and finished look.
Step 3–Secure The Board Shelves
- Position one side piece on its flat larger side and mark 7 inches from the board top. Mark the entire board surface at 7-inch intervals and repeat the process for the other board. You will nail the board shelves at these points. Line up the first shelf piece with the first mark, applying glue over it. Repeat this process for all marks and let the glue dry. Nail the glued pieces to the side bo…
Step 4–Sand Edges
- You need to sand the edges of the top, bottom and side pieces in order to create a finished look. You may paint or stain the wood if you want to add a more personalized touch.
Step 5–Secure The Ready Display Case
- It is time to secure your new golf ball display case to a wall of your choice. Use two nails for each side of the display case. Position the golf balls in the indentations, with their labels or insignias on top. You may now relax and enjoy the fruit of your efforts.