
How Do I Remove the Shaft of a Golf Club?
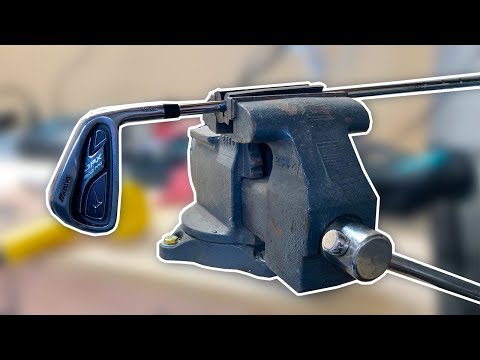
- Place the shaft, or what remains of it if it is broken, in a vise parallel to the floor. Secure the shaft in the vise.
- Apply heat evenly to the hosel for about a minute, using a heat gun or heat torch. ...
- Remove heat from the hosel and twist the club head counterclockwise. It should twist off fairly easily.
- Clean out any remaining epoxy in the hosel. ...

How do I clean up golf club shafts?
How Do I Remove the Shaft of a Golf Club? Step 1. Place the shaft, or what remains of it if it is broken, in a vise parallel to the floor. Secure the shaft in the... Step 2. Apply heat evenly to the hosel for about a minute, using a heat gun or heat torch. …
How do you replace a golf club shaft?
Nov 21, 2013 · https://www.hirekogolf.com - Have fun and learn how to repair or disassemble a graphite-shafted golf club, while getting started in custom golf clubmaking in...
How much does it cost to reshaft a golf club?
Step 1. Completely cover the head of the club with masking tape to prevent the head from being scratched during the process. Now, place the club in the vise, so that the middle of the shaft is the part being held in the vise. Make sure the club is held securely.
How to reshaft a golf club?
Place the grip end of the club on the ground so the head end is sticking straight up and gently pull the head off the shaft. Do not twist, especially if you want to reuse the shaft or sell it, as...

How do you remove a golf club shaft without a puller?
How do you remove an iron shaft?

How do you remove a graphite golf club shaft?
How do you change a shaft on a golf club?
Can you replace shafts on irons?
How much does it cost to put a shaft on a golf club?
How do you remove a graphite shaft at home?
How do you remove graphite shaft without a shaft puller?
How do you remove a graphite iron shaft?
Step 1
Place the shaft, or what remains of it if it is broken, in a vise parallel to the floor. Secure the shaft in the vise.
Step 2
Apply heat evenly to the hosel for about a minute, using a heat gun or heat torch. This will break down the epoxy that bonds the shaft to the hosel and make removal easier. If you are working with graphite shafts, use a heat gun, not a torch. Wear goggles and protective gloves.
Step 3
Remove heat from the hosel and twist the club head counterclockwise. It should twist off fairly easily. If it does not, apply more heat.
Step 4
Clean out any remaining epoxy in the hosel. Begin using a file and scrape away the residue, then apply a solvent to a small rag and wipe down the interior of the hosel. You may want to push the rag in with the tip of a screwdriver or similar tool.
Step 1
Completely cover the head of the club with masking tape to prevent the head from being scratched during the process. Now, place the club in the vise, so that the middle of the shaft is the part being held in the vise. Make sure the club is held securely.
Step 2
Take the utility knife and cut off the small plastic piece at the base of the shaft, also called the "ferrule." If the ferrule doesn't come off easily, use the butane torch to heat it a bit, and then it should come right off.
Step 4
Apply pressure to the clubhead, while applying heat to the hosel at the same time. Continue doing this until the epoxy bond has softened and the clubhead comes off easily.
Step 1
Put on protective gloves and keep them on until the procedure is complete.
Step 2
Heat the hosel (small metal joint linking the shaft to the club head) with a heating gun. Be sure to dispense heat evenly on all sides of the hosel and don't be alarmed if small amounts of white smoke begin to escape the hosel cavity. That is just the old epoxy melting.
Step 3
Place the grip end of the club on the ground so the head end is sticking straight up and gently pull the head off the shaft. Do not twist, especially if you want to reuse the shaft or sell it, as twisting may harm the inner walls of the hosel as well as the tip of the shaft.
Step 4
Allow the club head to cool completely once its been liberated from the shaft.
Step 5
Roll up a small piece of sandpaper and use it to clean out any remaining epoxy residue inside the hosel joint, making it ready for the insertion of a new shaft.
What Materials Need To Prepare
In order to commence the removal properly, you have to meet the necessary material list for reaching the best preparation, particularly:
Important Notes To Know Before Removing Golf Club Shaft?
Before moving on to the main part, we want to share some basic yet crucial notes for detaching the golf shaft.
How To Remove And Assemble A New Shaft?
Once you have already finished equipping all the essential tools and vital notes, let’s find out the separation process.
Bottom Lines
If you still keep reading us until these final lines, we believe that from now on, you will be confident to try the edge-cutting shaft technology as well as adjust the shaft flexibly to your golf’s length.
Step 1
Use a utility knife to scrape off the ferrule at the connection point between the shaft and the clubhead. Scrape down toward the head and away from your body.
Step 3
Press down on the hosel with a pry bar. Do not twist the head off, as this can damage the shaft. As you press on the hosel, have your other hand ready to catch the clubhead when it drops off the shaft.
Removing an Adapter from a Wood or Driver
The process for removing an adapter is very similar to removing a graphite shaft with a minor twist as shown in the video below.
About the Author: Zach Gollwitzer
Hey!! I'm Zach, the founder of The DIY Golfer. I created this site in 2015 while playing D1 collegiate golf to help myself understand the game of golf better and improve as a player. Fast forward a few years, and it has become much more than a journal.
