How do I remove the center console in golf?
3:175:00How to remove VW MK5 Golf Centre Console Removal - YouTubeYouTubeStart of suggested clipEnd of suggested clipRemove the center of the Gator and take the outer trim off now you'll want to loosen the hand brakeMoreRemove the center of the Gator and take the outer trim off now you'll want to loosen the hand brake mechanism and completely remove the adjustment screw this will allow the handbrake to point straight
How do I remove center console cover?
0:182:54How to Remove the Console lid on a 2015-2018 Chevy/GM Truck or SUVYouTubeStart of suggested clipEnd of suggested clipHere screw here then the corresponding side same spots one on the bottom pulling towards the topMoreHere screw here then the corresponding side same spots one on the bottom pulling towards the top okay. Just take your Phillips head undo that and then this whole top console that's going to come off.
How do you open the center console?
0:112:52How To Open A Center Console That Doesn't Unlatch 2000 Chevrolet ...YouTubeStart of suggested clipEnd of suggested clipThe center console so where it will open all you got to do is get a screwdriver.MoreThe center console so where it will open all you got to do is get a screwdriver.
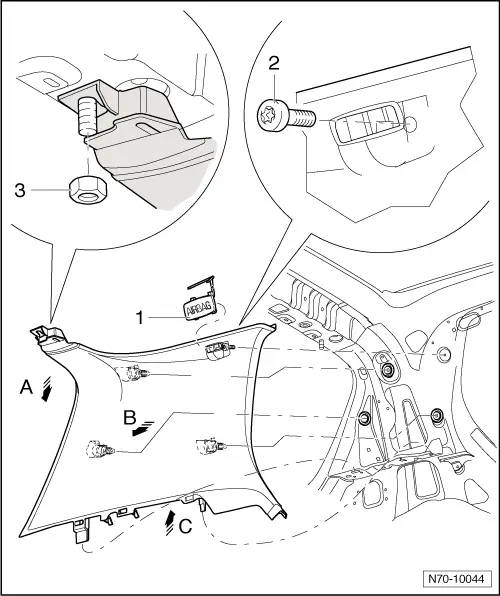
How do you remove the Centre console on a VW Polo?
How to remove cover for centre console from a Polo 6R Remove gearstick sleeve or gear selector cover from mountings Remove dash panel middle trims Remove bolts -1- and -2- (1.5 Nm). Push down tabs -3-. Detach cover from centre console by moving in direction of rear bench seat.
How do you replace center console armrest cover?
0:014:03How to replace armrest cover in your car for just $20. - YouTubeYouTubeStart of suggested clipEnd of suggested clipThere are two retaining pins in the back of the armrest lid one on each side use a flatheadMoreThere are two retaining pins in the back of the armrest lid one on each side use a flathead screwdriver to remove both pins the armrest lid can be easily detached.
How do I replace center console?
0:193:252015 - 2020 GMC Yukon Center Console Lid Replacement - YouTubeYouTubeStart of suggested clipEnd of suggested clipIf you don't have this you can use a flathead screwdriver something you just need to be carefulMoreIf you don't have this you can use a flathead screwdriver something you just need to be careful because it's real easy to uh to scuff it up or break.
How do you remove the center console lid on a 2014 Ford Explorer?
2:0117:19How to Remove Center Console Explorer w/details - YouTubeYouTubeStart of suggested clipEnd of suggested clipAnd just pry it in a twisting motion. Okay on the side. It simply slides up but you got to give it aMoreAnd just pry it in a twisting motion. Okay on the side. It simply slides up but you got to give it a little bit more room on the edge.
How do you open a stuck Chevy center console?
0:085:01Stuck Middle Console Latch Repair 99-06 Silverado Sierra (How To)YouTubeStart of suggested clipEnd of suggested clipAnd all you're really gonna need is some wd-40. And some sort of flathead screwdriver. Or maybe evenMoreAnd all you're really gonna need is some wd-40. And some sort of flathead screwdriver. Or maybe even a multi-tool. These are the actual center console lid with stuck closed.
How do you remove the center console on a 2010 Hyundai Elantra?
0:084:21Hyundai Elantra: How to remove the center console (2007-2010)YouTubeStart of suggested clipEnd of suggested clipThey are covering two Phillips screws which you can undo. Inside the center armrest remove theMoreThey are covering two Phillips screws which you can undo. Inside the center armrest remove the carpet at the base and this will reveal two ten millimeter sockets which you'll need to undo.
How do you take the radio out of a VW Polo 9n?
1:333:24How to Remove VW Polo/Audi Radio (Double DIN) - YouTubeYouTubeStart of suggested clipEnd of suggested clipOut now to remove the tools you have to push tool in and then there's your clip here to push intoMoreOut now to remove the tools you have to push tool in and then there's your clip here to push into that clip and then pull the tool out. Okay once the clips are removed.
Step 1
This image shows you an overview of all the clips we need to release to remove the door card. There are three different styles of clips:
Step 2
Using a trim removal tool, release the plastic cover on the door handle.
Step 4
Looking at the underside of the door card, rotate this clip 90 degrees.
Step 7
With the door card loose, you need to unplug a series of wiring clips, which will vary between passenger and driver doors, as well as vehicle trim specification.
Introduction
We’ll be showing you how to remove the A Pillar trim, and associated trim around the triangular glass alongside the dashboard on your MK7 Golf. This tutorial will be helpful if you’re installing a dashcam / radar detector, upgrading your speakers, or tinting this small section of glass.
Step 5
Continue to seperate the A Pillar Trim from the vehicle. You will then be able to unplug the tweeter by squeezing the connector.
Step 6
The trim is now ready to be released from the dashboard. This step is quite difficult, and takes some twisting and firm pulling to release the trim.
Step 7
The trim surrounding the triangular glass can now be released. Use a trim removal tool to release the clip, and push upwards from the bottom. It will twist out of the dashboard.
Step 11
Next, insert the A Pillar trim into the dashboard. This is the most difficult part, and requires a range of twisting and pushing to insert the trim correctly. It need to lock in behind the glass trim, and alongside the dashboard.
Introduction
This tutorial will show you how to remove the rear door card on your MK7 Golf and is applicable for both Left and Right rear doors.
Step 2
Using a trim removal tool, release the plastic cover on the door handle.
Step 4
Looking at the underside of the door card, remove the red reflector with a trim removal tool and rotate this clip 90 degrees.
Step 9
Reconnect all wiring looms and the door lock cable. The cable slides into a slot as shown then clips down into position.